For decades, UVB light therapy has been a trusted treatment for skin conditions like psoriasis and eczema. But its benefits don’t stop at the skin’s surface. Because it works by calming the body’s immune response, researchers are now exploring its incredible potential for other autoimmune conditions where systemic inflammation and fatigue are major issues. This makes it one of the most exciting innovative treatment options available today. If you and your doctor are considering this path, you need a clear roadmap. This guide provides exactly that, with straightforward UVB light therapy at home instructions to help you navigate this cutting-edge treatment with confidence.
Key Takeaways
- Embrace At-Home Treatment for Better Consistency: At-home UVB therapy is a precise medical treatment, not sunbathing. Its main advantage is convenience, which helps you stick to your prescribed schedule—the most important factor for seeing results.
- Master Your Pre- and Post-Session Routine: Success comes from a consistent process. Always start with clean, dry skin, use your device for the exact time prescribed, and follow up by moisturizing to keep your skin healthy and hydrated.
- Partner with Your Doctor for Safe Treatment: You are in charge of your sessions, but your doctor is your guide. Always wear your UV-blocking goggles, track your skin’s response in a journal, and communicate any concerns to your provider to ensure your plan stays safe and effective.
What Is UVB Light Therapy and How Does It Work?
You may have heard of light therapy, also known as phototherapy. At its core, it’s a treatment that uses specific wavelengths of ultraviolet (UV) light on your skin to help manage certain health conditions. Think of it as a targeted, therapeutic dose of light prescribed by your doctor. When your skin is exposed to these specific UV rays under medical supervision, it can trigger a natural response in your body. This process helps to calm an overactive immune system and reduce the inflammation that drives many autoimmune symptoms.
This isn’t a new wellness trend; it’s a medically recognized treatment that has been used for decades, particularly in dermatology. The goal is to slow down rapid cell growth and inflammation. By using a controlled amount of UV light, we can help regulate the body’s immune responses right at the source. For those of us looking for innovative treatment options that go beyond just managing symptoms, understanding how light therapy works is the first step toward taking control of your health.
The Science Behind Narrowband UVB
So, what makes “narrowband” UVB special? Think of the UV light spectrum as a rainbow. Instead of using the whole rainbow, narrowband UVB (NB-UVB) therapy isolates one very specific “color” or wavelength of light—around 311 nanometers. Narrowband UVB’s immune-calming effect is more than a general “anti-inflammatory” idea; it works through several specific pathways that start in the skin and ripple outward. When NB-UVB penetrates the skin, it can shift immune signaling by reducing overactive T-cell activity (including CD8 T cells) and by promoting more “calm-down” messaging in the immune network. It is also associated with increased anti-inflammatory cytokine activity, including IL-10, and it supports vitamin D synthesis, which plays a role in immune modulation. Researchers also describe how UVB exposure can trigger the release of signaling molecules that circulate systemically and help dial back immune overactivation beyond the treated skin area. Decades of research have shown that this tiny slice of the UVB spectrum is the therapeutic sweet spot. It’s highly effective at treating certain conditions without exposing the skin to the broader, more damaging wavelengths of UV light. By harnessing this very controlled, narrow band of light, we can achieve the desired immune-calming effects with a much better safety profile.
Conditions It Can Help
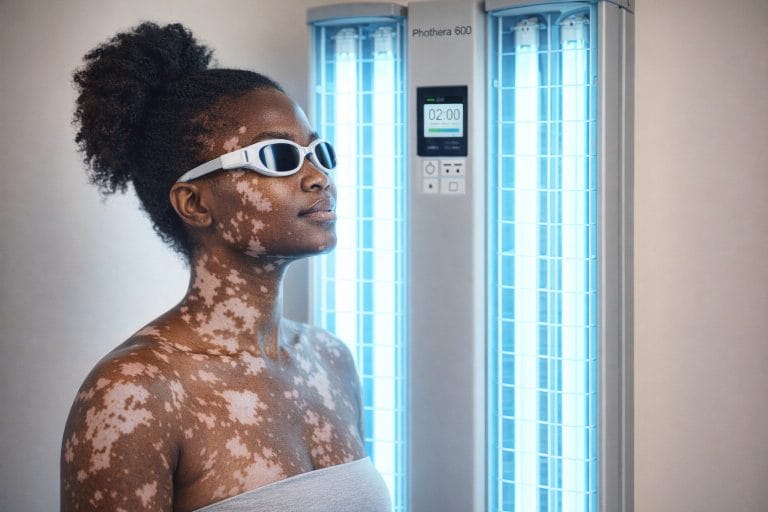
Historically, UVB light therapy has been a game-changer for skin conditions like psoriasis, eczema, and vitiligo. For eczema specifically, UVB therapy is often framed as a way to calm the immune “overdrive” that fuels redness, itch, and flare cycles, rather than only treating the surface. By reducing the inflammatory activity of immune cells in the skin (including the T-cell-driven component), UVB therapy may help interrupt the stubborn itch pattern and give irritated skin time to recover. As inflammation settles, many people notice that thickened, red patches fade and skin tone looks more even, and ongoing moisturizing becomes more effective because the skin barrier is less inflamed and better able to hold hydration. Many treatment plans also include a longer-term strategy where remission is the goal, and maintenance sessions may be used when needed to help keep flare-ups controlled. It works by slowing down the excessive growth of skin cells and reducing inflammation. But the benefits don’t stop at the skin’s surface. Because it works by calming the immune system, researchers are now exploring its potential for other autoimmune conditions where systemic inflammation and fatigue are major issues. Studies like the LITE study have even shown that at-home phototherapy can be just as effective as in-office treatments for psoriasis, paving the way for more accessible care.
Beyond dermatology, some interest in UVB therapy comes from its potential relevance to systemic symptoms that track with immune dysregulation, including persistent fatigue in autoimmune contexts. The proposed logic is that when immune activity and inflammatory signaling are reduced, the body can redirect energy away from constant immune “high alert,” which may translate into better daily stamina for some people. This page-to-body connection is also discussed alongside vitamin D synthesis and other light-driven signaling effects, and some people report changes in sleep quality and mental clarity as their overall inflammatory load improves. In this framing, UVB therapy is positioned as a way to address drivers of fatigue like inflammation and circadian disruption rather than only masking symptoms.
The Benefits of At-Home UVB Therapy
Managing a chronic condition often feels like a full-time job. Between doctor’s appointments, pharmacy runs, and the daily effort of just feeling well, it can be exhausting. When a treatment requires multiple trips to a clinic each week, it can add another layer of stress and logistical challenges, sometimes making it feel impossible to keep up. This is where at-home UVB therapy can make a real difference. It puts you back in control, allowing you to integrate a powerful, effective treatment into your life on your own terms. Instead of arranging your entire schedule around clinic visits, you can fit your therapy sessions into your daily routine whenever it’s most convenient. This approach offers more than just a simple convenience; it provides the flexibility to maintain consistency, which is key for seeing results. It also saves valuable time and money and allows for a treatment plan that’s truly tailored to you. By bringing this clinically proven therapy into your home, you remove some of the biggest hurdles to consistent care. It’s about making effective treatment accessible and sustainable, empowering you to take a more active role in managing your health without letting it take over your life.
Treat on Your Schedule
Living with an autoimmune condition requires consistency, but life is rarely predictable. At-home UVB therapy removes the barrier of rigid appointment times, giving you the freedom to treat yourself when it works best for you—whether that’s first thing in the morning or before you go to bed. This flexibility makes it so much easier to stick with your treatment plan long-term. As researchers have noted, home treatment offers a convenient and effective option that fits seamlessly into your life. By bringing your therapy home, you can focus more on healing and less on logistics, making it one of the most practical innovative treatment options available for managing chronic inflammation and fatigue.
Save Time and Money
Clinic-based phototherapy can be a major commitment. As one study points out, “Going to a clinic for UVB treatment (2-3 times a week) can be hard because of time, travel, and cost.” When you add up the time spent commuting, waiting for your appointment, and taking off work, the hours quickly accumulate. Then there are the direct costs: gas, parking, and potential co-pays for every single session. An at-home device is an investment in your well-being that simplifies your life. It eliminates those recurring travel expenses and logistical headaches, freeing up your resources and energy for the things that matter most.
Personalize Your Treatment Plan
Your health journey is unique, and your treatment plan should be too. At-home UVB therapy, guided by your healthcare provider, allows for a highly personalized approach. It’s not about guessing; it’s about following a precise prescription tailored to your specific needs. Doses are customized based on your skin type, the nature of your condition, and your ultimate treatment goals. This level of personalization means you and your doctor can make adjustments as you progress, ensuring your therapy remains effective. It empowers you to take an active role in your care, working in partnership with your provider to achieve the best possible results.
Getting Started: Your Pre-Treatment Checklist
A little prep work goes a long way in making your at-home UVB therapy both safe and effective. Before you turn on your device, there are a few key steps to take. Think of this as your pre-session checklist—it ensures everything is in order for a smooth experience. Getting these things right from the start helps you build a consistent routine and gives you the best chance at seeing positive results. Let’s walk through what you need to do.
Get Your Prescription
First things first: you’ll need a prescription. At-home UVB therapy is a medical treatment, so it’s crucial to have a healthcare provider guiding you. Your doctor will assess your condition, confirm that UVB therapy is a good fit, and write the prescription needed for an FDA-cleared device. They will also create a personalized treatment plan, detailing how often and for how long you should use the light. This partnership is key to safely managing your autoimmune disease and ensuring your treatment is tailored specifically to your body’s needs.
Choose the Right FDA-Cleared Device
With your prescription in hand, it’s time to select your device. At-home units come in different forms, from smaller handheld wands for targeted spots to larger full-body panels. The best choice depends on the areas you need to treat, and your doctor can help you decide which type will be most effective. Most importantly, make sure you choose an FDA-cleared device. This clearance means the equipment has been reviewed for safety and effectiveness, giving you peace of mind that you’re using a reliable and well-regulated medical tool for your therapy.
Create a Safe Treatment Space
Your treatment environment matters. Find a private, well-ventilated room where you can set up without interruptions and away from other bright lights. Before you begin, read your device’s instruction manual carefully to understand all the operational and safety rules. A key part of a practical approach to home phototherapy is ensuring no one else, including pets, is in the room during your session. This prevents accidental UV exposure and keeps your treatment space secure and dedicated to your health.
How to Prep Your Skin for Treatment
Getting ready for your UVB session is simple, but a few key steps can make a huge difference in your results and safety. Think of it like prepping a canvas before you paint—you want a clean, clear surface to work with. Taking a few minutes to prepare your skin properly ensures the light can do its job effectively and helps you avoid any unwanted irritation. Here’s exactly what you need to do before you flip the switch.
Your Pre-Treatment Skincare Routine
The golden rule of UVB therapy is to start with clean, completely dry skin. For your treatment to be effective, the light needs a direct path to your skin. That’s why it’s best to avoid applying any lotions, creams, or moisturizers for at least 24 hours before your session. These products can create a barrier that blocks the light from penetrating properly. Before you begin, gently wash the treatment area with a mild, fragrance-free cleanser and water, then pat your skin completely dry with a clean towel. This simple step ensures you get the full benefit from every second of your therapy.
What to Avoid Before Your Session
Just as important as what you do is what you don’t do. Before a session, make sure your skin is free of makeup, sunscreen, perfume, and any other products that could interfere with the light. Some ingredients can even make your skin more sensitive to UV light, leading to irritation. It’s also a good idea to avoid using harsh chemicals or exfoliants on the areas you plan to treat. If you use any prescription topical medications, talk to your doctor about when to apply them so they don’t conflict with your light therapy schedule. The goal is to have nothing between your skin and the light.
Protect Sensitive Skin and Your Eyes
Safety first, always. Protecting your eyes is non-negotiable. You must wear the UV-blocking goggles that come with your device during every single treatment. Regular sunglasses won’t cut it, as they aren’t designed to block this specific wavelength of light. You should also cover any areas of your skin that you aren’t treating. You can use clothing or a high-SPF sunscreen on these spots. Finally, make sure you’re alone in the room during your session to prevent exposing anyone else to the UV light. Creating a safe treatment environment is a crucial part of a successful at-home therapy plan.
Your Step-by-Step Guide to At-Home Treatment
Once you have your device, you’re ready to begin. Following a clear, consistent routine is the key to getting the most out of your light therapy while keeping your skin safe and healthy. Think of this as your personal treatment ritual—a few moments dedicated to your well-being. Let’s walk through the process together, step by step, so you can feel confident every time you turn on your device.
Set Up Your Device Correctly
Before your first session, it’s essential to have a clear treatment plan from your healthcare provider. This isn’t just a suggestion—it’s a prescription that outlines the exact dosage and frequency you need for your specific condition. Once you have your protocol, take a moment to read through your device’s instruction manual from cover to cover. Get familiar with all its features, especially the safety timer, which is your most important tool for preventing overexposure. Setting this up correctly before every single session is a non-negotiable step. This ensures every treatment is not only effective but, most importantly, safe for your skin.
Find the Right Position and Distance
Consistency is your best friend when it comes to light therapy. For every session, you’ll want to position yourself at the exact distance from the device that your doctor or the manual recommends. This is crucial because the intensity of the light changes with distance, and even a few inches can alter the dose your skin receives. Mark a spot on the floor if you need to! It’s also vital to protect sensitive areas. Always wear the provided UV-blocking goggles to shield your eyes—no exceptions. Use clothing or a high-SPF sunscreen to cover any skin that you aren’t actively treating to prevent unnecessary exposure.
Time Your Session Perfectly
Timing is everything. Your doctor will give you a specific schedule, which often starts with very short sessions just a few times a week. It’s incredibly important to stick to the prescribed duration for every treatment. Consistency matters, but it also helps to know how clinicians often think about interruptions, because missed time can change how tolerant your skin is to UVB. If you miss sessions, your care team may reduce your next dose to avoid irritation, because tolerance can drop during breaks even when you are following the same device and distance rules. One general rule of thumb described for home schedules is reducing the dose by about 25% after a 12–20 day gap and by about 50% after a 21–27 day gap, and if the gap is longer (around 28 days or more), some plans restart from the initial dose under clinician guidance. The practical takeaway is that missed sessions usually do not “ruin” results, but they can require dose adjustment, so your safest move is to document the gap and follow your provider’s restart instructions instead of guessing. While it might be tempting to add a few extra minutes, thinking it will speed up results, overexposure can lead to skin irritation or damage. On the flip side, cutting sessions short can make your treatment less effective, slowing down your progress. Trust the personalized plan your provider created for you—it’s carefully calculated to help you achieve the best results safely and steadily over time.
Follow Key Safety Protocols
Think of your dermatologist or healthcare provider as your partner in this process. You should have their full approval before starting at-home UVB therapy, and you’ll want to continue with regular check-ups to monitor your progress and make any necessary adjustments. In between appointments, become an expert on your own skin. Pay close attention to how it responds after each session. A little bit of pinkness can be normal, but if you notice any significant redness, itching, or burning, it’s time to check in. Don’t hesitate to contact your healthcare provider if you experience any side effects that concern you.
What to Do After Your Session
Your UVB therapy session might be over, but your care routine isn’t. What you do in the hours and days following your treatment plays a big role in your results and overall skin health. Think of it as the cool-down after a workout—it’s essential for recovery and getting the best outcome. By following a few simple steps, you can soothe your skin, track your progress accurately, and manage any reactions safely and effectively. Let’s walk through exactly what your post-treatment plan should look like.
Your Post-Treatment Skincare Routine
After exposing your skin to UVB light, the first thing you should do is moisturize. A gentle, fragrance-free moisturizer will help soothe and hydrate the treated areas, preventing dryness and irritation. If your doctor has prescribed any topical creams or ointments, now is the time to apply them as directed. It’s equally important to know what to avoid. Steer clear of harsh skincare products containing exfoliants, retinoids, or strong fragrances on the treated skin for at least 24 hours, as these can cause unnecessary irritation. Your skin has just been through a therapeutic process, so be kind to it.
Monitor Your Skin’s Reaction
Paying close attention to how your skin responds after each session is key to a successful treatment plan. A little bit of pinkness, similar to a mild sunburn, can be normal, but you’ll want to watch for anything more significant. This is where a treatment journal comes in handy. After every session, jot down the date, the duration of your treatment, and any reactions you notice, like redness, itching, or warmth. This log provides valuable information for you and your doctor, helping you both track your progress and make any necessary adjustments to your routine. This simple habit ensures your treatment remains both safe and effective.
How to Handle Mild Redness
It’s common to experience some mild redness or pinkness a few hours after your session, and this usually fades within a day. If you notice this, it’s a sign to let your skin fully recover before your next treatment. Don’t treat again until the redness is completely gone. You should also let your doctor know, as they may recommend reducing your next session’s duration. While light therapy is generally safe, it’s important to understand the potential phototherapy risks. If you ever experience severe redness, blistering, or pain, stop your treatments and contact your doctor right away. Always prioritize safety and keep your healthcare provider in the loop.
How to Track Your Progress
Starting a new treatment can feel like a big step, but you’re not going it alone. Tracking your progress is one of the most important parts of at-home UVB therapy because it helps you and your doctor see what’s working. Think of it as a feedback loop—your skin and body give you information, and you use that information to fine-tune your treatment for the best results. This isn’t just about checking boxes; it’s about becoming an active partner in your own health journey.
By paying close attention to how your body responds, you can ensure you’re staying within a safe and effective therapeutic window. Consistent tracking helps your care provider make informed decisions about your treatment plan, like adjusting session times or frequency. It also empowers you to understand your body’s signals, giving you confidence and control over your therapy. We’ll walk through a few simple but powerful ways to monitor your progress, from keeping a dedicated journal to knowing exactly when to pick up the phone and call your doctor. These practices are key to making your at-home treatment a success and are central to the innovative treatment options available for managing autoimmune conditions.
Keep a Treatment Journal
A treatment journal is your best friend during at-home UVB therapy. It doesn’t have to be complicated—a simple notebook or a note on your phone works perfectly. After each session, take a minute to jot down the date, the duration of your treatment, and which parts of your body you treated. Most importantly, record how your skin and body feel. Did you notice any pinkness? How were your overall symptoms, like fatigue or inflammation, that day? This detailed log creates a clear picture of your progress over time and becomes an invaluable resource for discussions with your doctor, helping them make precise adjustments to your care plan.
Know What’s Normal (and What’s Not)
It’s essential to learn your skin’s language during UVB therapy. A normal, expected reaction is mild pinkness in the treated area, similar to a faint sunburn, which should fade within about 24 hours. This indicates that the light is doing its job. However, you should pay close attention to reactions that go beyond this. If you experience redness that persists, deepens, or is accompanied by itching, burning, or pain, that’s your skin telling you the dose was too high. Understanding this difference is key to preventing overexposure and ensuring your treatment remains both safe and beneficial.
When to Call Your Doctor
Never hesitate to reach out to your healthcare provider if you have concerns. You should contact their office if you experience any side effects that persist or worsen, like itching or burning that doesn’t go away. Your doctor can offer advice on how to handle side effects, such as suggesting soothing creams for mild redness. If you ever develop a severe burn or blisters, stop your treatments immediately and call your doctor right away. They are your partner in this process, and keeping them informed ensures you can continue your therapy safely and effectively.
Staying Safe During At-Home UVB Therapy
Taking your treatment into your own hands is empowering, but it also comes with the responsibility of making safety your top priority. Think of it as a partnership between you, your device, and your doctor. Following your prescribed plan and a few key safety protocols is the best way to get the results you’re looking for without any setbacks. It’s not complicated—it just requires being mindful and consistent. By protecting your eyes, carefully managing your exposure time, and maintaining an open line of communication with your healthcare provider, you can ensure your at-home UVB therapy is both safe and effective. It also helps to understand what “normal” timing can look like with narrowband UVB reactions so you don’t confuse expected feedback with a problem. Mild pinkness can appear hours later (often described as showing up 8–14 hours after exposure) and usually fades within a day, which is part of how providers fine-tune dosing over time. Long-term safety questions are common, and narrowband UVB is often described as preferred over older approaches because studies have not shown a direct link between NB-UVB and increased skin cancer risk when used in controlled doses, though regular skin checks are still recommended as part of responsible care. Eye protection remains non-negotiable because unprotected UV exposure can cause painful eye irritation and may increase cataract risk, so the UV-blocking goggles are an essential part of every single session.
Protect Your Eyes and Maintain Your Device
This is the most important rule of at-home UVB therapy: always, always wear your UV-blocking goggles. Your eyes are extremely sensitive to ultraviolet light, and the specialized eyewear that comes with your device is designed to protect them completely. Even in a clinical setting, providers will confirm you’re wearing proper eye protection before starting a session. Make it a non-negotiable step in your routine. Beyond personal protection, keeping your device in good shape is also a safety measure. Regularly wipe down the bulbs and the unit to remove dust, which can interfere with the light output. A clean, well-maintained device delivers a more consistent and predictable dose, which is exactly what you want for safe, effective treatment.
Avoid Overexposure
When it comes to UVB therapy, more is not better. Your doctor created a specific treatment plan for you based on your skin type and condition, and sticking to it is essential. Overexposure can lead to redness, burns, and discomfort, which can derail your progress. The goal is to get a therapeutic dose, not a tan. As experts in dermatology note, UV doses are customized for each person’s unique needs. Use a timer for every single session and never extend your time, even if you feel like it’s not doing much. The effects of UVB light are cumulative, and consistency at the prescribed dose is what leads to long-term success with these innovative treatment options.
Stay in Touch with Your Doctor
At-home UVB therapy doesn’t mean you’re on your own. Your doctor is your most important resource and partner throughout this process. Keep them updated on your progress, and don’t hesitate to reach out if you have questions or notice any unusual skin reactions. Regular check-ins allow your doctor to monitor your results and make adjustments to your treatment plan as needed. This collaborative approach is key to the success of home phototherapy. Studies have shown that strong support and coverage for home phototherapy machines are crucial for improving patient outcomes, and that success is built on clear communication between you and your care team.
Common Myths About At-Home UVB Therapy
When you’re exploring new treatment options, it’s easy to get tangled up in misinformation. At-home UVB therapy is a safe and established treatment, but a few common myths still cause confusion. Let’s clear the air and separate fact from fiction so you can feel confident about your treatment plan. Understanding the truth behind these misconceptions is the first step toward taking control of your health on your own terms. We’ll walk through the most frequent concerns, from how well it works compared to clinic visits to what a session actually feels like.
Myth: It’s Less Effective Than In-Clinic Treatment
It’s a common assumption that treatment administered in a clinic must be more powerful or effective than something you can do at home. However, research shows that consistency is the most important factor for success with UVB therapy. At-home treatment makes it much easier to stick to the schedule your doctor prescribes. A major study on light therapy effectiveness found that better access to home phototherapy machines is crucial for improving patient health outcomes. When you can treat yourself without the hassle of travel and appointments, you’re more likely to complete your full treatment course and see the results you’re looking for.
Myth: It’s the Same as Sunbathing
This is one of the most important myths to debunk. Sunbathing exposes your skin to a wide spectrum of UV light, including UVA rays that can cause premature aging and increase skin cancer risk. At-home phototherapy uses a very specific, controlled wavelength of light called narrowband UVB. This targeted approach allows medical professionals to safely treat common skin conditions and other autoimmune responses without the risks associated with general sun exposure. Think of it as the difference between a floodlight and a laser pointer—one is broad and uncontrolled, while the other is precise and therapeutic. Your at-home device delivers only the helpful part of the light spectrum.
Myth: The Treatment Is Painful
The idea of using light as a medical treatment can sound intense, but phototherapy is not a painful process. Unlike other procedures that might involve discomfort, UVB therapy is gentle on the body. Most people report feeling a mild warmth on their skin during a session, similar to standing in the sun for a few moments. It’s designed to be a comfortable experience. Leading medical institutions confirm that phototherapy is a safe, painless and effective form of treatment for many conditions. You can relax during your sessions knowing that the process is working to calm your immune system without causing any pain.
Related Articles
- How UVB Phototherapy Works and Starting Steps – Cytokind
- Clinical NB-UVB Phototherapy: Advanced Care
- Home Phototherapy – Cytokind
- Order NB-UVB Therapy Device
- Safe NB-UVB Phototherapy Devices for Home & Clinical Use
Frequently Asked Questions
How long does it take to see results from at-home UVB therapy? Patience and consistency are your best friends with this treatment. While every person and condition is different, most people begin to see improvements after several weeks of regular sessions. The key is to stick to the exact schedule your doctor prescribes. This isn’t an overnight fix, but a gradual process of calming your immune system. Your treatment journal will be a great tool for noticing the small, steady changes along the way.
Is at-home UVB therapy the same as using a tanning bed? Absolutely not, and this is a critical distinction. Tanning beds emit a broad spectrum of uncontrolled UVA and UVB light, which is not therapeutic and carries significant health risks. In contrast, a medical-grade at-home device delivers a very precise, single wavelength of narrowband UVB light. This is a targeted medical treatment prescribed by a doctor to achieve a specific therapeutic outcome without the damaging rays associated with tanning.
What does the treatment actually feel like on my skin? Most people find the treatment to be quite comfortable and straightforward. During a session, you will likely feel a gentle, mild warmth on the areas being treated. It is not painful, and it shouldn’t feel hot or cause any burning sensations. If you ever experience discomfort beyond this gentle warmth, it’s a sign to stop and check in with your healthcare provider.
Can I continue using my other medications while doing UVB therapy? This is an important conversation to have with your doctor before you begin. You should provide them with a complete list of all your medications, including prescriptions, over-the-counter drugs, and even supplements. Some medications can make your skin more sensitive to light, so your doctor needs the full picture to create a safe and effective treatment plan for you.
Do I really need a prescription for an at-home device? Yes, a prescription is required, and for good reason. At-home UVB therapy uses an FDA-cleared medical device that delivers a specific dose of ultraviolet light. A doctor’s oversight is essential to ensure this treatment is right for your condition, to determine the correct dosage and schedule for your skin type, and to monitor your progress safely. This ensures you get the best possible results without risking overexposure.